Main Menu Implementation: Title Screen to Gameplay in Unreal Engine 5
Build a functional main menu with play, options, and quit — including the input mode gotchas and platform quirks nobody warns you about.

Every game needs a front door.
No matter how polished your mechanics, players judge your project within seconds of launching it — and the main menu is the first thing they see. A clean, functional title screen signals professionalism. A broken one signals “back to Steam library.”
This tutorial walks through building a complete main menu in UE5: widget creation, button wiring, level loading, an options submenu with volume and resolution controls, and the input mode switching that trips up nearly every beginner. Everything here uses Blueprints and targets UE 5.1+.
Prerequisites: You should be comfortable with the UE5 editor basics — creating Blueprints, navigating the Content Browser, and connecting nodes in the Event Graph. If you’ve completed Epic’s Third Person template, you’re ready. No C++ required.
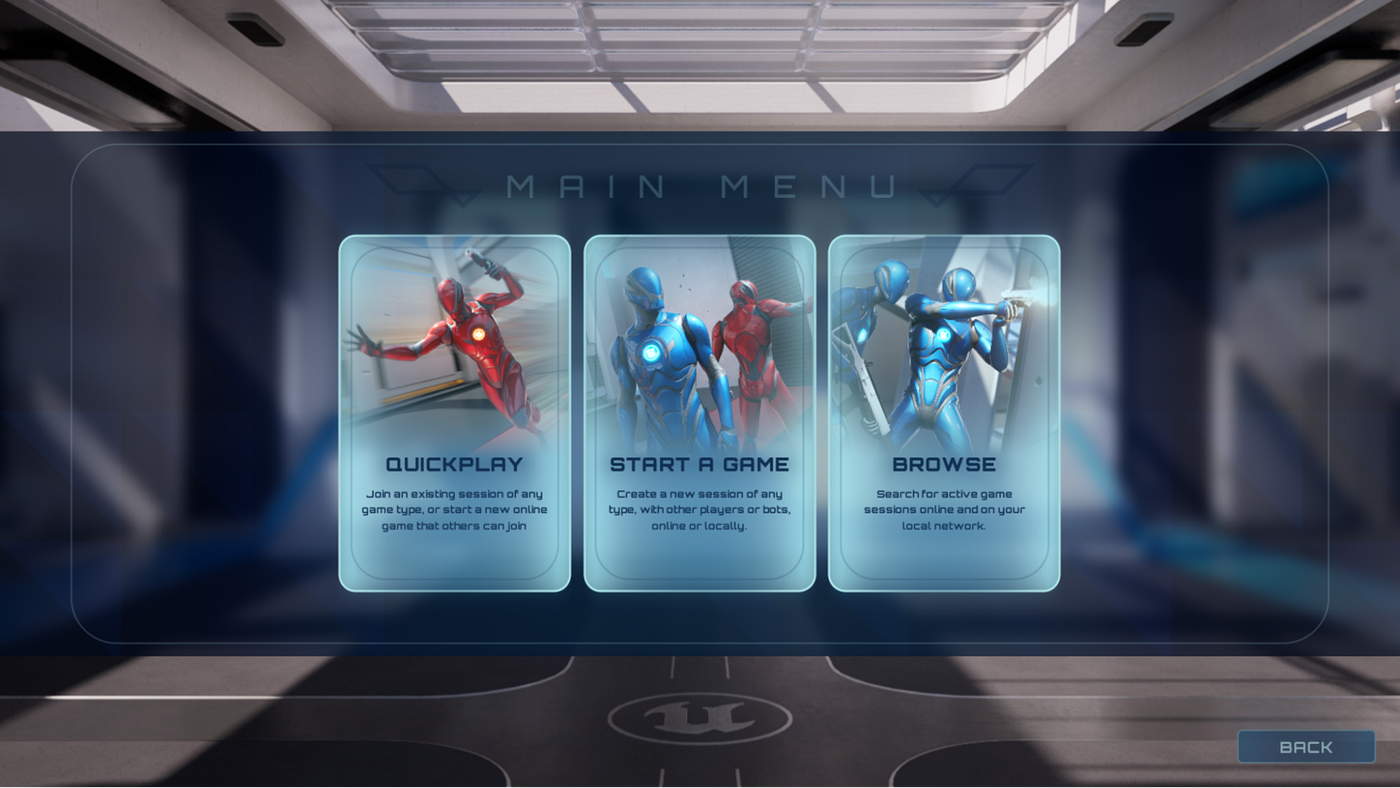
Creating the menu widget
Create a Widget Blueprint via Content Browser → Add (+) → User Interface → Widget Blueprint, selecting User Widget as the parent class. This opens UMG’s two-tab editor: the Designer tab for visual layout and the Graph tab for Blueprint logic.
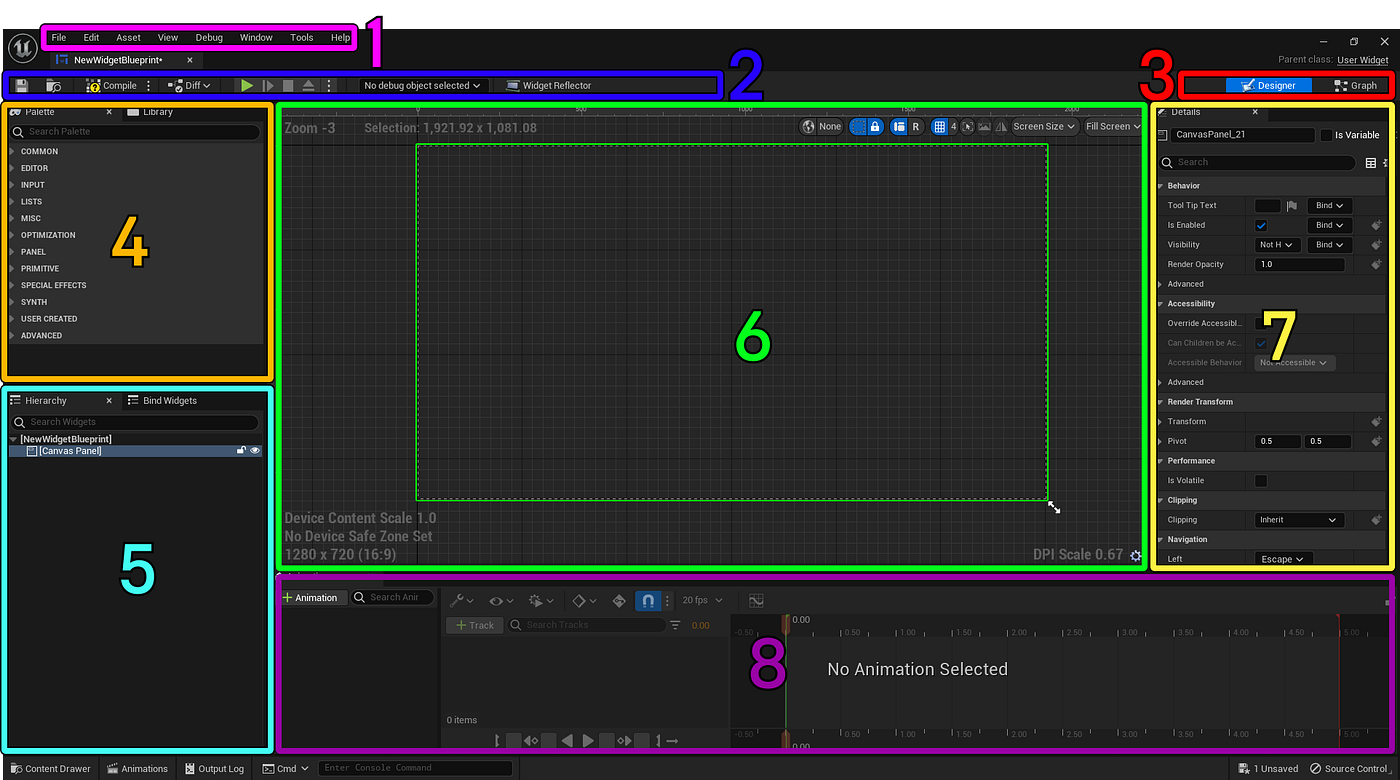
1- Menu Bar: It contains the common menu options.
2- Tool Bar: It contains a number of commonly used functions for the Blueprint Editor, such as Compile, Save, Browse, Play, and so on.
3- Editor Mode: It switches the Blueprint Editor between Designer and Graph modes.
4- Palette: It contains the list of widgets, that you can drag into the Visual Designer window. Displays any class inheriting from UWidget.
5- Hierarchy: It displays the structure of the User Widget. You can also drag widgets from Palette panel into this panel.
6- Visual Designer: It is the visual representation of the UI layout. Also, you can manipulate widgets you dragged into the Visual Designer.
7- Details: It displays the properties of the selected widget. You can adjust them via this panel.
8- Animations: This is the animation track for UMG which allows you to keyframe animations for your widgets. (Epic Games)
Skip Canvas Panel — use Overlay instead
The default root widget is a Canvas Panel, and your first move should be removing it. Canvas Panel uses absolute pixel positioning that breaks across resolutions unless every anchor is meticulously configured. The community consensus: replace it with layout containers unless you specifically need pixel-perfect overlap positioning.
Use an Overlay as the root (stacks children on top of each other), containing an Image widget for the background and a Vertical Box for the menu buttons. Vertical Box stacks children top-to-bottom and handles resolution scaling cleanly.
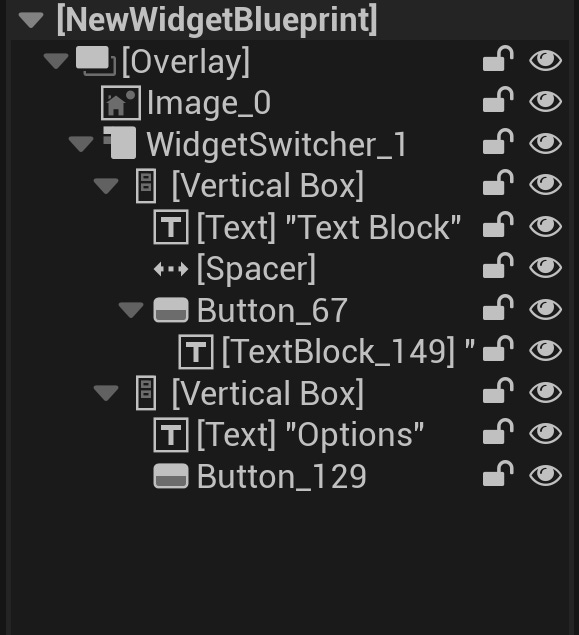
Here’s the target hierarchy:
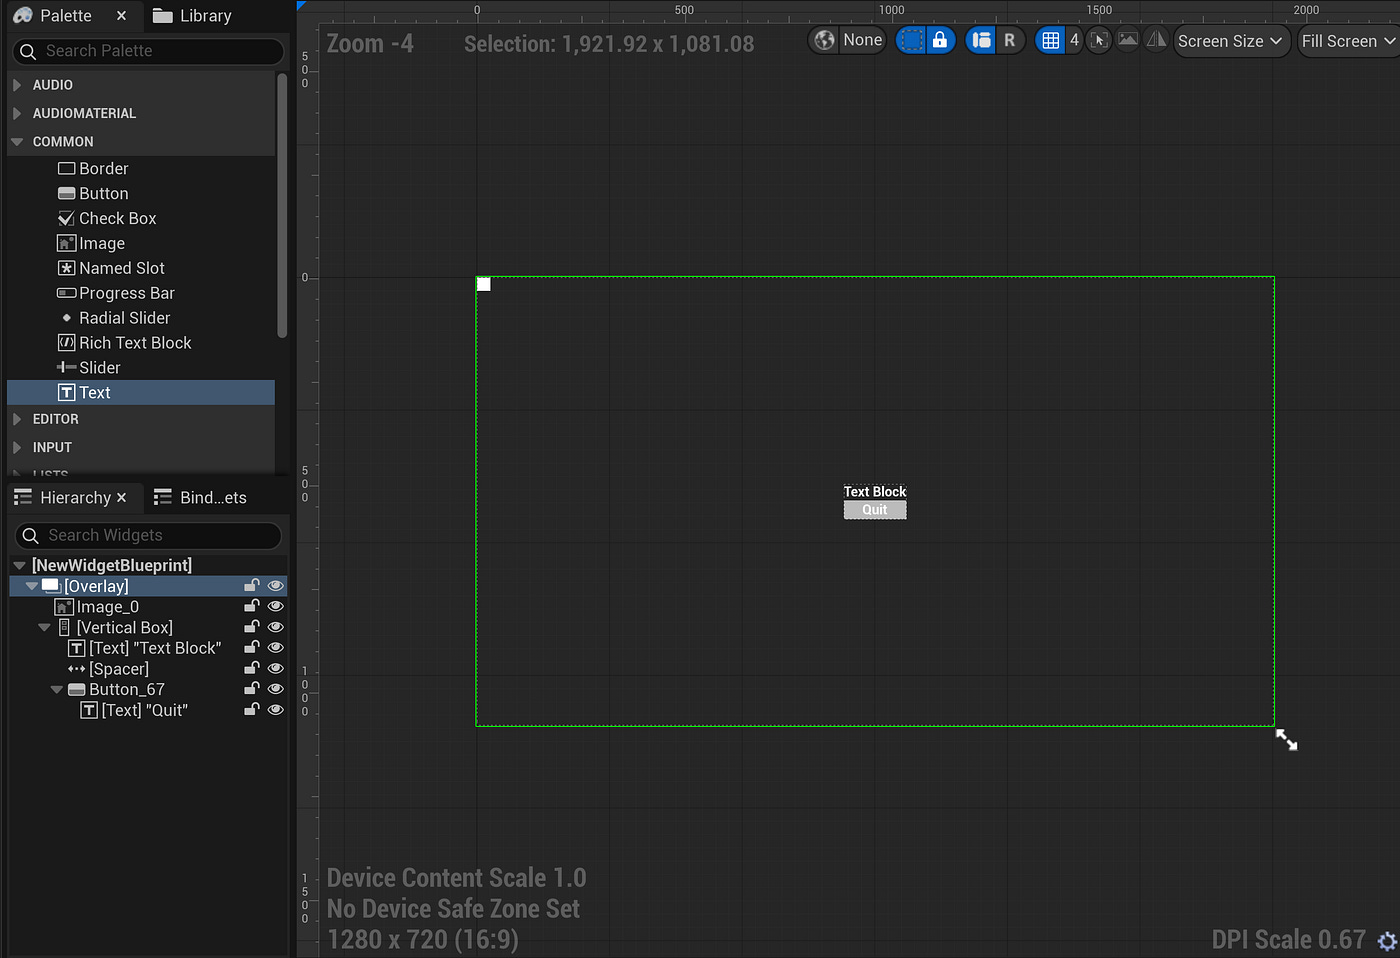
One critical setting: enable Is Focusable on the root User Widget in the Details panel. This allows the widget to accept keyboard and gamepad focus — essential for controller navigation and for Set Input Mode UI Only to properly direct input to your menu.
Showing the menu on a dedicated level
Create a dedicated level: File → New Level → Empty Level, saved as L_MainMenu. Set it as your startup map in Project Settings → Maps & Modes → Game Default Map.
Create a custom GameMode (BP_MainMenuGameMode) with Default Pawn Class set to None — this prevents a playable character from spawning behind your menu. Assign it in the level’s World Settings → GameMode Override.
Use a PlayerController, not the Level Blueprint
While plenty of tutorials spawn widgets from the Level Blueprint, a custom PlayerController is the proper approach. Level Blueprints are locked to a single level and can’t be reused. The PlayerController is accessible anywhere via Get Player Controller and is the correct owner of input and UI state.
Create BP_MenuPlayerController and assign it in your GameMode’s Player Controller Class.

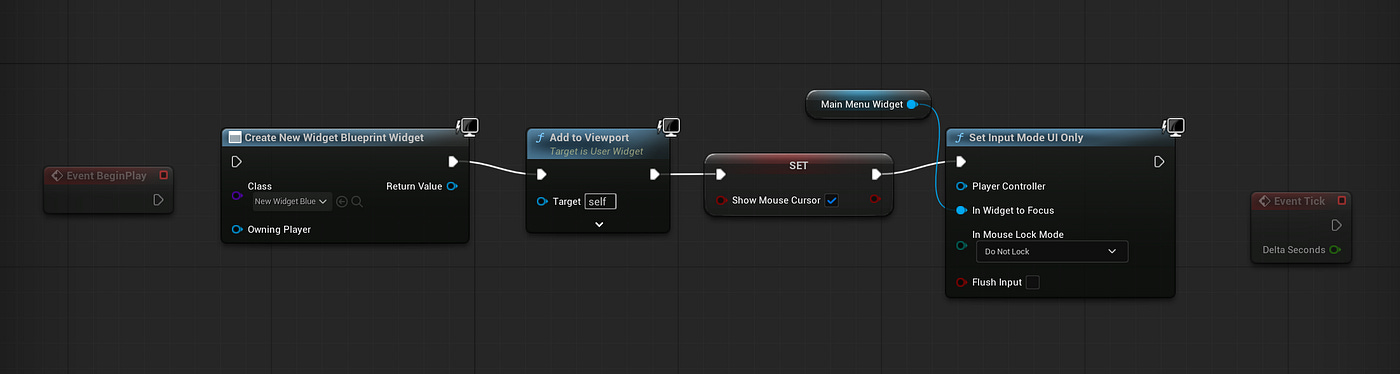
Inside your PlayerController’s Event BeginPlay, wire these four nodes in order:
Create Widget — set Class to your menu Widget Blueprint. Promote the Return Value to a variable (
MainMenuWidget).Add to Viewport — plug in the widget reference.
Set Show Mouse Cursor —
Trueon Self.Set Input Mode UI Only — pass
MainMenuWidgetinto In Widget to Focus. Set In Mouse Lock Mode toDo Not Lock.
The order matters: the widget must be in the viewport before it can receive focus. Calling Set Input Mode UI Only before Add to Viewport silently fails.
Input mode switching — and the stuck-axis bug
Understanding UE5’s three input modes is critical. Getting them wrong produces some of the most confusing bugs you’ll encounter.
Set Input Mode Game Only — All input goes to gameplay; UI is unresponsive. Set Flush Input to True when transitioning from a menu to prevent the “stuck axis” bug where buffered input causes the camera to drift or the character to walk on its own.
Set Input Mode UI Only — All input goes to the UI widget. The Player Controller receives nothing — not even Escape. Handle keyboard shortcuts inside the widget by overriding On Key Down.
Set Input Mode Game And UI — UI gets priority, but unhandled input falls through to gameplay. Use for in-game overlays like inventory where the player can still move.
None of these nodes show or hide the mouse cursor. That’s always a separate
Set Show Mouse Cursorcall. This catches everyone at least once.
Wiring the Play button
Select your Play button in the Designer, switch to the Graph tab, and click + next to On Clicked in the Details panel.
The click handler does four things in order:
Remove from Parent (on Self — destroys the widget)
Get Player Controller → Set Show Mouse Cursor to
FalseGet Player Controller → Set Input Mode Game Only with Flush Input =
TrueOpen Level (by Object Reference) — select your gameplay map
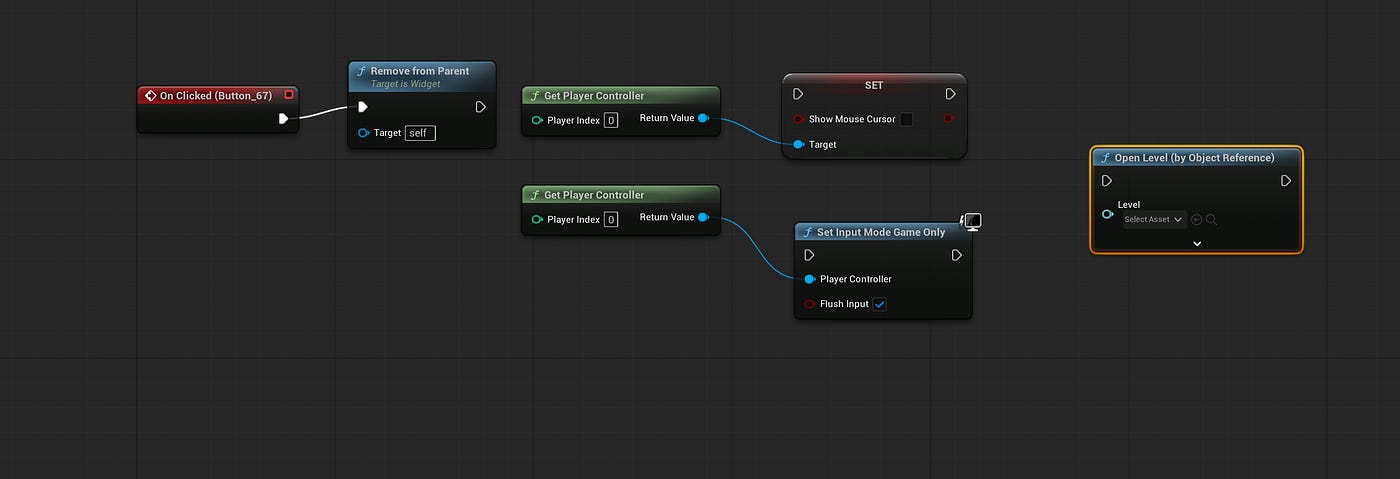
Why Object Reference instead of Name? In UE 5.1+, Open Level (by Name) has a confirmed bug where packaged builds reload the current level instead of the target. The Object Reference version uses a Soft Object Reference to the map asset — no string typos, correct dependency tracking, and proper build inclusion.
On the destination gameplay level, reinforce the input state in its BeginPlay: call Set Input Mode Game Only and Set Show Mouse Cursor = False. This guarantees a clean state.
Building the options submenu
The cleanest approach is the Widget Switcher panel, which displays exactly one child at a time by index.
Wrap your existing Vertical Box in a Widget Switcher (Palette → Panel). Mark it as a variable called
MenuSwitcher.Add a second Vertical Box as another child — for options content. Main menu is index 0, options is index 1.
Options button’s OnClicked: call Set Active Widget Index on
MenuSwitcherwith value1.Back button inside options: same node, value
0.
The Widget Switcher shows one child and hides the rest — zero cost for inactive panels.
Simple audio options: volume sliders
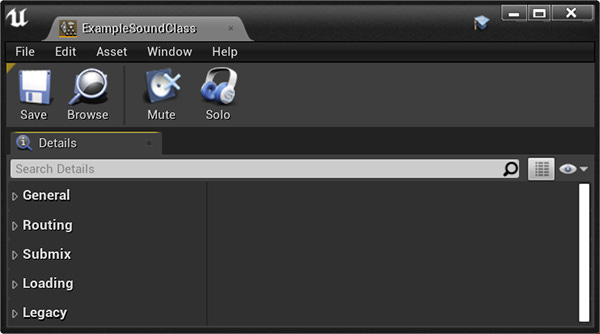
UE5’s volume control requires two asset types: Sound Classes and Sound Class Mixes.
Create three Sound Classes: SC_Master, SC_Music, and SC_SFX. Open SC_Master and add the other two as children. Then create a Sound Class Mix called Mix_VolumeControl — leave defaults, you’ll override at runtime.
In your options panel, add two Slider widgets — Music and SFX. Set Min Value to 0.0, Max Value to 1.0, Value to 1.0.
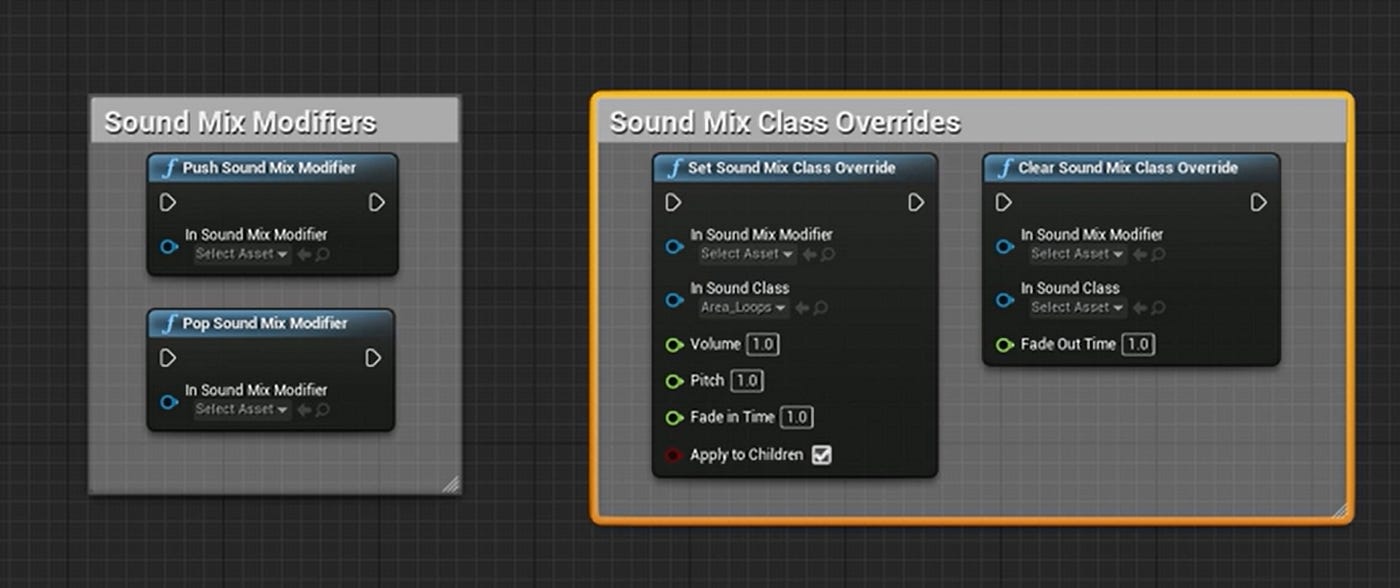
In the widget’s Event Construct, call Push Sound Mix Modifier passing Mix_VolumeControl. This must be called before overrides work.
For each slider’s On Value Changed, call Set Sound Mix Class Override:
In Sound Mix Modifier:
Mix_VolumeControlIn Sound Class:
SC_MusicorSC_SFXVolume: the slider’s value
Fade In Time:
0.0Apply to Children:
True
⚠️ Volume of exactly 0.0 can stop sounds entirely rather than playing silently. Use
0.0001as your minimum.
Persist settings with a SaveGame subclass containing MusicVolume and SFXVolume floats. Save via Save Game to Slot when the player applies; load via Load Game from Slot in Event Construct to restore slider positions.
Simple graphics options: resolution and quality
The UGameUserSettings class exposes graphics settings to Blueprints through Get Game User Settings. All changes are staged until you apply them.
Resolution: Add a ComboBoxString. In Event Construct, call Get Supported Fullscreen Resolutions to get IntPoint values. Loop through, format as "{X}x{Y}", and call Add Option. When the user selects one, parse it back and call Set Screen Resolution.
Quality: Add a ComboBox with “Low”, “Medium”, “High”, “Epic”. Map the index to Set Overall Scalability Level (0–3). For window mode, Set Fullscreen Mode accepts Fullscreen, Windowed Fullscreen, or Windowed.
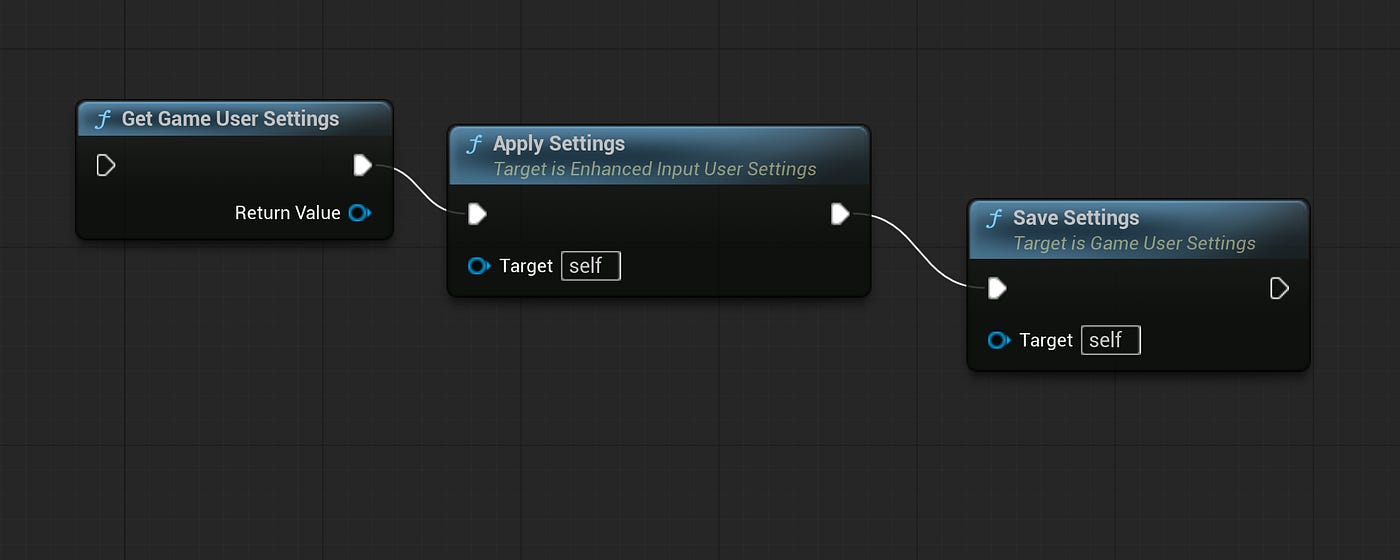
Saving: Call Apply Settings then Save Settings to write to GameUserSettings.ini. For resolution changes, consider a confirmation timer — if it expires, call Revert Video Mode so players don’t get stuck.
The quit button — and why consoles don’t want it
The Quit Game node takes a Player Controller and a Quit Preference enum (Quit to terminate, Background to suspend).
Here’s what most tutorials skip: console certification generally prohibits games from terminating themselves. Sony’s TRC, Microsoft’s TCR, and Nintendo’s Lotcheck expect players to exit via the system dashboard. A quit button that calls Quit Game can fail certification.
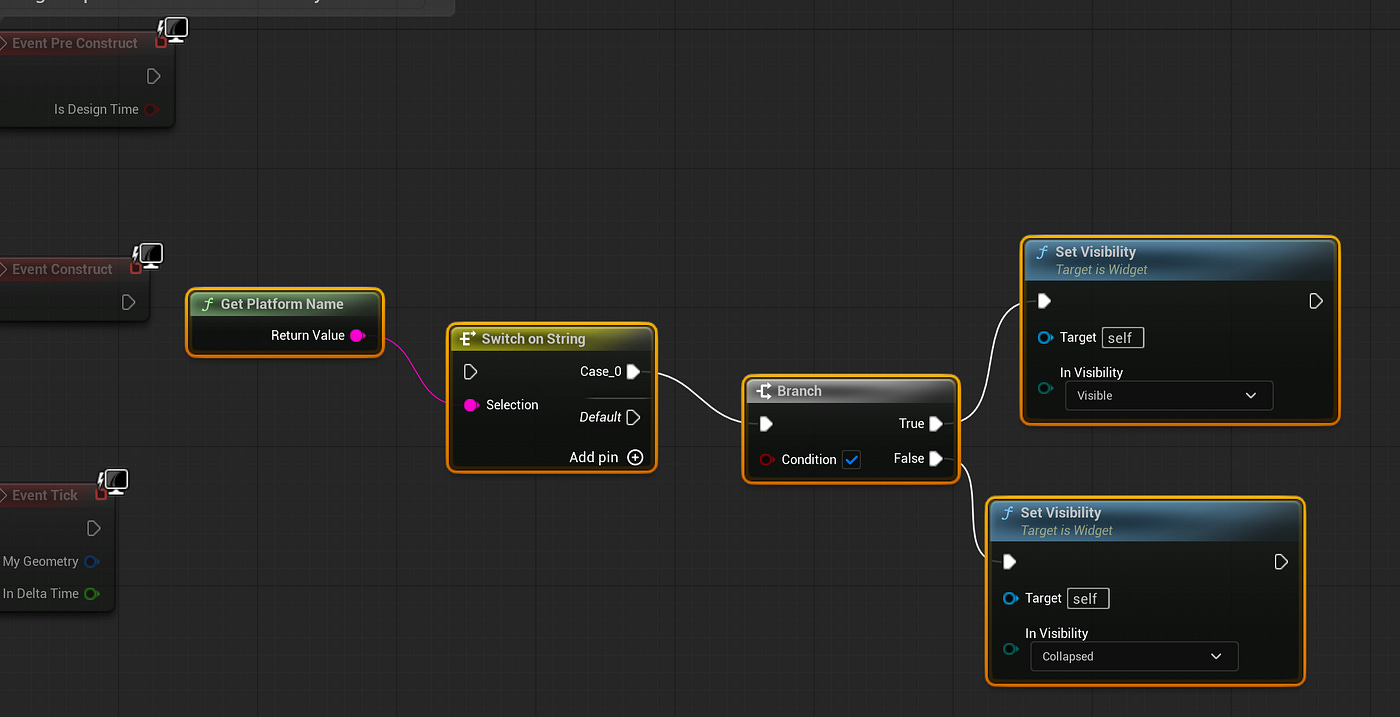
The fix: in Event Construct, call Get Platform Name (returns Windows, Mac, Linux, PS5, XSX, Switch, etc.). For desktop platforms, keep the quit button Visible. For everything else, set visibility to Collapsed — removes it from layout entirely, no awkward empty space.
On the Quit button’s OnClicked: just a Quit Game node with Quit Preference set to Quit.
Troubleshooting common failures
Main menus fail silently in UE5. Here’s what to check:
Widget not showing. You called Create Widget but forgot Add to Viewport. Always chain both. Also check root Visibility isn’t Hidden or Collapsed.
No mouse cursor. Set Input Mode UI Only does not show the cursor. Call Set Show Mouse Cursor = True separately. Every. Single. Time.
Buttons don’t respond. Check root panel Visibility — Hit Test Invisible blocks all mouse events. Use the Widget Reflector (Window → Developer Tools → Widget Reflector) to debug.
Character drifts after closing menu. Call Set Input Mode Game Only with Flush Input = True in the destination level’s BeginPlay.
Widget garbage collected. If you Remove from Parent without a strong reference variable, it gets collected. Store it on the PlayerController or recreate each time.
Next steps
These patterns extend directly. A pause menu uses the same Widget Switcher but toggles Set Game Paused and Set Input Mode Game And UI. For gamepad support, look into Epic’s Common UI plugin for focus-based navigation across input devices.
Build the menu early, test in a packaged build (input behavior differs from Play-In-Editor), and gate your quit button behind a platform check. These foundations scale to every UI screen in your game.
Thanks for reading. If this helped you, consider sharing it with another indie dev who’s fighting with UE5 menus right now.
Hyperdense is a two-person indie studio building atmospheric games and sharing what we learn along the way. Follow us on Medium for more UE5 tutorials.